Simplifying Software Development with Containers
Data Intellect
Did somebody say containers?

Recently a client asked us to move from our legacy integration and deployment system, being largely manual and based in AWS CodeCommit and EC2, to Bitbucket.
The plan was to leverage native deployment pipelines, source control, and JIRA integration in Bitbucket, and to explore other improvements in CI/CD practices at the same time.
The decision was eventually taken to move away from silo deployments (mostly) and deploy applications as containers, where possible.
Cue mild panic.
Most of the team had not ventured beyond throwing up a local container to run a self-contained application (not unlike a siloed server with more steps), and now, we were going to migrate a lot of separate interconnected processes to containers that had to communicate, have data access and deploy independent of each other across multiple environments.
Challenge Accepted.
What Are Containers?
Containers are not dissimilar to Virtual Machines, however, where VMs have complicated setups, reserved storage, are very memory intensive, and must be maintained for use. Containers are scalable, disposable, lightweight, and infinitely reusable, and can have persistent data by simply attaching a local volume.
Think of containers as encapsulated environments for software applications, bundling everything they require to operate, from code and libraries to dependencies. They ensure uniformity across various native OS environments, which simplifies the development, deployment, and management of the applications, by separating the deployed code from the underlying system architecture and environment. Containers enable these applications to function reliably, regardless of the host system’s setup. They’re lightweight, portable, and perhaps most importantly, disposable, making them the perfect choice for testing and deploying applications across different platforms and remaining agile enough to iterate code versions almost on demand.
Now, let’s talk about development containers (devcontainers) – these are like specialised toolkits created specifically for software development workflows. Within a devcontainer, we find all the necessary tools and dependencies tailored for working on a project. This setup guarantees that every member of the team operates within a consistent development environment, from necessary libraries and extensions to IDE configurations and linting rules. Devcontainers streamline the setup phase for developers, enabling them to swiftly establish a standardised development environment without the hassle of manually installing dependencies or tinkering with configurations. This not only boosts productivity but also ensures that everyone is on the same page, operating within a harmonised environment, avoiding the dreaded “That worked on my laptop” problem.
Using Docker CLI to run containers
To build and interact with containers, we use a tool called Docker engine to create our containers. They are built from “images”, created using a Dockerfile that can leverage other created or stock images (such as one with Python preinstalled).
An example Dockerfile might look like this:
# Standardised base architecture

FROM --platform=linux/x86_64 python:3.11 as base

# Where we want our code to live on the container

WORKDIR /workdir

# Local env variables for the container

ENV VIRTUAL_ENV=/usr/local

# Copy the local repo into the container for isolated development

COPY .. .

# This syntax caches the downloaded python packages

RUN pip install -r requirements.txt

FROM base AS my_app_service

ENTRYPOINT [ "python", "-m", "my_app.run_service"]This image can then be built using the command:
docker build –target “my_app_service“ -t my_app:latest -f /path/to/Dockerfile .
The –target argument specifies the image target, we could extend our Dockerfile to account for various entry points, versions, and services built from a common foundation by adding other lines defining additional targets.
FROM base AS my_app_service
ENTRYPOINT [ "python", "-m", "my_app.run_service"]


FROM base AS my_app_task
ENTRYPOINT [ "python", "-m", "my_app.run_task"]The -t flag is the tag for the image, while this one is built locally, tagging is important on deployed containers in services such as ECR/ECS to ensure running applications use the correct, or latest code versions. However, it allows us to reference a locally built image if we want to run the container without pulling anything further from a container repository.
We can run this container locally with this command:
docker run -d my_app:latest
This will run the application from the entry point specified in the Dockerfile, we can add other flags, such as -i to run it interactively, more information on that, and other flags, are available on the Docker docs.

Is this enough?
At this stage we are still developing on our own laptop and running the code to ensure it works in a container, it’s better than trying to run code natively, but it can be better.
What about doing the development, debugging, and testing work INSIDE a container?
How To Run a Devcontainer
We’ll use VS Code as it is probably the most widely adopted development platform. We need to have the devcontainers extension installed to access this IDE functionality.
At the top level of your repo add a folder called “.devcontainer”. VS Code will see this and provide contextual prompts to manage most of the setup for a standardised work environment. It expects one file as a minimum, the devcontainer.json file.
There are several sample versions available in VS Code and online, here is an example:
{
    "name": "My DevContainer",
    "image": "my_app:latest",
    "containerEnv": {
        "ENV": "DEVCONTAINER"
    },
    "customizations": {
        "vscode": {
            "settings": {
                "python.testing.pytestEnabled": true,
                "python.testing.unittestEnabled": false,
                "terminal.integrated.shell.linux": "/bin/bash",
                "files.exclude": {
                    ".coverage": true,
                    ".pytest_cache": true,
                    "__pycache__": true
                }
            },
            "extensions": [
                "VisualStudioExptTeam.vscodeintellicode",
                "ms-python.python",
                "vscode-icons-team.vscode-icons",
                "ms-python.black-formatter"
            ]
        }
    },
    "workspaceFolder": "/devcontainer",
    "workspaceMount": "source=${localWorkspaceFolder}/.devcontainer/,target=/workspace,type=bind"
}
Getting into the devcontainer
This json file states that it will be built from the latest image version of my_app, this should be available on your chosen flavour of image repository, or available locally (like having run the docker build command earlier).
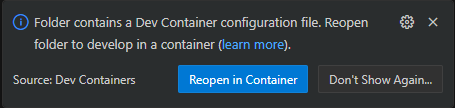
When we open this working directory in VS Code, a prompt will pop up.
Clicking Reopen in Container will let VS Code configure, start, attach, and reopen the source code in a devcontainer.
It has all our dependencies installed via the requirements file, handled in the Dockerfile.
A huge added feature is that all terminals in VS Code are also running inside the container, debugging, testing, and general “poking around” is not being performed int he same type of environment the app will be released into. It also ensures that and quick changes can be seen running and doesn’t require a rebuild of the container.
It has standardised our VS code extensions, so multiple developers aren’t using different linting packages or helpers.
And we have eliminated the dreaded “it worked on my laptop” bug when sharing code with collaborators.
The devcontainer.json file provides flexibility to give custom environment variables (like we would have in different production environments) for testing features, it has a self-contained version of the local code that won’t amend the local files you have, and can push to source control as you would normally.
Our applications are now being developed in an environment that ensures everyone is on the same page, and perhaps more importantly, we can deploy them in a robust and scalable manner.
We use Bitbucket pipelines to deploy our various release branches into AWS ECR and run the tasks on ECS, a functionality previously not possible on silo deployment.
These CI/CD pipelines have ensured future scaling, changes and additions will be easily integrated into our development practices, and reliance on local code versioning in deployments is, hopefully, gone forever (we might even update on that in a future blog).
Conclusion
Transitioning to containerised software development has revolutionised our approach, simplifying complex deployment problems and enhancing efficiency across our workflows. Containers offer a standardised environment, ensuring uniformity and reliability in deployment, regardless of underlying system architectures.
By adopting development containers, we’ve streamlined setup processes, empowered collaboration, and eradicated local machine bugs. Leveraging tools like Docker engine and VS Code’s devcontainer extension, we’ve established a seamless development ecosystem, enabling consistent environments for every team member.
With Bitbucket pipelines orchestrating deployments to AWS ECR and ECS, we’ve embraced continuous integration and delivery, paving the way for scalable and agile development practices. As we continue on this containerisation journey, further improvements will help our development endeavours be as efficient and practical as possible.
Share this: