Data Intellect
The Financial Information eXchange (FIX) is a protocol used globally between financial entities, streamlining electronic trading and the standard in pre-trade and execution communications.
[gap size=”10px”]
As you might imagine, standing in the way between you and blissful FIX trading simplicity are some lengthy documentation and implementation requirements.
[gap size=”10px”]
In a previous blog post, we introduced the AquaQ API as a kdb+ implementation of the FIX protocol. In this post, we’ve extend that functionality further, to make the adapter even more powerful and straightforward to use!
[gap size=”10px”]
Before diving into the world of trade communication, let’s have a quick refresher on what makes up a FIX message. Messages consist of 3 parts: a header, body and trailer. Each piece of information is contained in the message as pairs of numerical tags and values. Take a look below at the basic timeline and the structure of a New Order Single message.
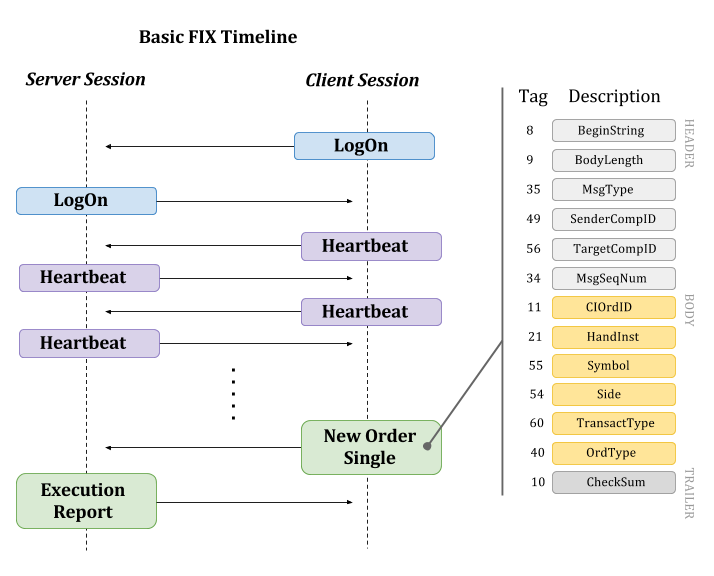
When the client and server first connect, a Logon message is sent, followed by Heartbeat messages at regular intervals to monitor the connection status. Other messages can then be sent to carry out trading activity, such as New Order Single and Execution Report.
[gap size=”10px”]
The FIX protocol defines the Message Type with tag <35>, which in this case would have a value D, denoting the New Order Single. Some of the types map directly to kdb+, for instance int and float. Others require more specific handling, parsing and converting of the FIX string formats into temporal kdb+ types. The AquaQ adapter extends kdb+ with new .fix namespace functions, written in C++, but behaving like native operations to send and receive messages. In this latest release, all of the typing and conversion is performed by the adapter, simplifying development of timeline logic in kdb+.
[gap size=”10px”]
Following the next few examples, you will be able to start communication between two sessions, send an order message and receive an execution report.
[gap size=”10px”]
[custom_headline type=”left” style=”margin-top: 0;” level=”h4″ looks_like=”h4″]Starting Client and Server Sessions[/custom_headline]
Starting both sessions with .fix.create[...] we immediately see our first message is received on both server (`acceptor) and client (`initiator) side! The function also allows you to explicitly specify a config file, or default to our own sample.ini. You’ll spot that Tag <35> is “A” – this is a Logon message. After the connection is established, the regular Heartbeat messages begin. It’s worth noting that we’re using the event handler function .fix.onrecv:{show x} to display to the console on receipt of a message.
[column type=”one-half”]
[code]
// Server Session
// Default config (sample.ini)
// From build dir, run: q fix.q
q).fix.create[`acceptor;()]
Defaulting to sample.ini config
Creating Acceptor
q)
8 | “FIX.4.2″
9 | 66i
35 | ,”A”
34 | 1i
49 | “AQUAQ”
52 | 2016.03.02D16:13:35.014000000
56 | “BROKER”
98 | 0i
108| 15i
10 | “055”
[/code][/column]
[column type=”one-half” last=”true”]
[code]
// Client Session
// Specified config file
// q fix.q
q).fix.create[`initiator;`:sessions/sample.ini]
Creating Initiator
q)
8 | “FIX.4.2″
9 | 67i
35 | ,”A”
34 | 13i
49 | “BROKER”
52 | 2016.03.02D16:16:47.634000000
56 | “AQUAQ”
98 | 0i
108| 15i
10 | “121”
[/code][/column]
[custom_headline type=”left” style=”margin-top: 0;” level=”h4″ looks_like=”h4″]Sending Single Order Message[/custom_headline]
Now that we’ve got our processes communicating, let’s send an order message! We’ve defined two new functions .fix.send_new_single_order and .fix.send_execution_report which construct a message dictionary of tags and values and send it using the .fix.send_message function defined by the adapter. We’ve also redefined .fix.onrecv with some logic that responds to a Single Order New message with an Execution Report.
[column type=”one-half”]
[code]
// (2) Order Message is received.
// After some logic in fix.q …
// (3) Execution Report is sent
q)
8 | “FIX.4.2″
9 | 120i
35| ,”D”
34| 180i
49| “AQUAQ”
52| 2016.03.03D16:58:18.209000000
56| “BROKER”
11| “SHD2015.04.04”
21| “2”
40| “1”
54| “2”
55| “TESTSYM”
60| 2016.03.03D16:58:18.209000000
10| “151”
[/code]
[/column]
[column type=”one-half” last=”true”]
[code]
// (1) Send an Order message
q).fix.send_new_single_order[`AQUAQ;`BROKER]
// (4) Execution Report received
q)
8 | “FIX.4.2″
9 | 148i
35 | ,”8”
34 | 180i
49 | “BROKER”
52 | 2016.03.03D16:58:18.210000000
56 | “AQUAQ”
6 | 1.38
14 | 100f
17 | “ORDER2015.04.04”
20 | “0”
37 | “ORDER2015.04.04”
39 | “0”
54 | “1”
55 | “TESTSYM”
150| “0”
151| 100f
10 | “017”
[/code][/column]
[custom_headline type=”left” style=”margin-top: 0;” level=”h4″ looks_like=”h4″]Constructing Messages[/custom_headline]
We’ve now seen how to send messages using some included sample functions, but how do we move beyond those? Constructing your own messages and modifying the message logic is as simple as defining your own functions in your q session or fix.q.
[gap size=”10px”]
Advertisement messages are used to announce completed transactions. The FIX adapter makes it very straightforward to construct one. Here, we’ve created a dictionary in the q session with suitable tag-value pairs. Sending it is then as simple as using the fix.send[] function defined by the adapter. This could all be contained within a function for reuse, like we saw earlier with fix.send_new_single_order .
[gap size=”10px”]
[code]
// Initialising empty dictionary
q) message:()!()
// Adding tag-value pairs
q) message[49]: “AQUAQ”
// … and populating the remainder of the dictionary …
// Completed message structure
q) message
8 | “FIX.4.2″
35| ,”7”
49| “AQUAQ”
56| “BROKER”
2 | “ADVERT624″
55| `AAPL
4 | ,”B”
53| 200f
5 | ,”N”
// Sending the message
q) .fix.send[message]
[/code]
How about trying to write your own Indication of Interest message? Or even add some additional logic for when to respond to a New Order Single message with an Execution Report?
[gap size=”10px”]
Everything to get started yourself can be found at the AquaQ GitHub repository. Full build instructions are included in the documentation.
Share this: